

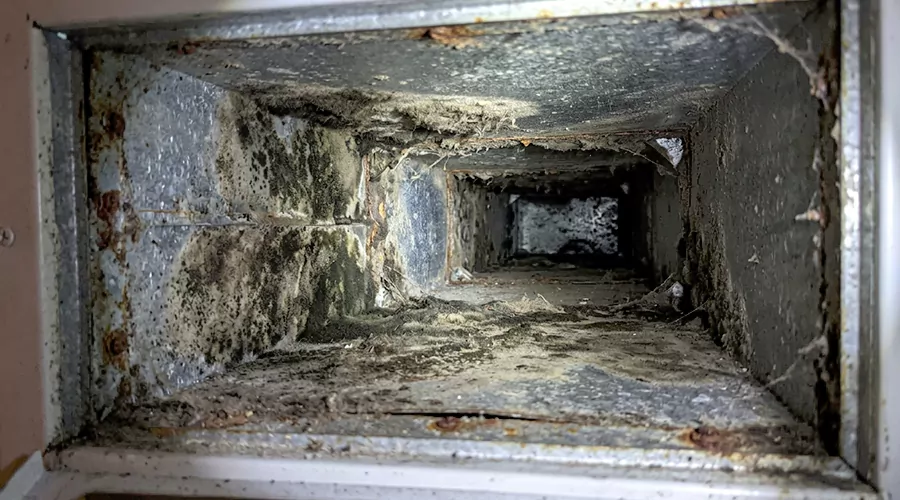
Mold in heating ducts develops when moisture enters the duct system and remains on surfaces that contain dust or other nutrients. Water leaks and poorly maintained furnace humidifiers are possible causes. Mold can begin growing on damp materials within 24 to 48 hours under suitable conditions, even if the ducts later carry warm air.
Heating ducts distribute warm air throughout a home during colder months. Unlike air conditioning equipment, a furnace does not normally create water inside the supply ducts as part of heating the air. However, the duct system may contain moisture from earlier cooling operation or water entering through damaged building components.
Warm air does not automatically eliminate existing mold contamination. Drying conditions may prevent further growth, but established material can remain on duct surfaces. Identifying where the water originated is necessary before determining whether the affected ductwork can be cleaned or needs replacement.
What Causes Mold to Grow Inside Heating Ducts?
Mold develops inside heating ducts when water reaches materials that can support fungal growth. The moisture may originate from a roof leak or equipment connected to the furnace. Condensation can also occur when humid air contacts cold duct surfaces. Heating alone is not sufficient to create mold without moisture.
Leaking Furnace Humidifiers
Some forced-air heating systems include a whole-house humidifier connected to the ductwork. These devices introduce controlled amounts of moisture into the air to help manage dry indoor conditions during winter. When properly installed and maintained, they should not allow water to collect inside the ducts.
Problems can develop when the humidifier leaks or its drainage system becomes obstructed. Water may enter the surrounding duct section or accumulate near the furnace cabinet. If nearby insulation remains damp, mold can develop on suitable surfaces. Regular humidifier maintenance is particularly important because the equipment introduces water directly into the heating system.
Water Leaks Around Ductwork
Heating ducts may pass through attics or basements where roof and plumbing leaks can occur. Water entering these spaces can reach duct connections or soak surrounding insulation. The affected materials may remain damp even after the visible water source disappears.
Hidden duct sections can be particularly difficult to inspect because damage may develop behind finished ceilings or walls. A leak near one supply branch can cause localized contamination without affecting the entire heating system. Identifying the building leak is necessary before attempting to restore the duct material.
Condensation in Poorly Insulated Ducts
Condensation develops when humid air contacts a surface below its dew point. During winter, this may occur where warm humid indoor air reaches a cold duct surface in an unheated space. Poorly sealed connections or inadequate insulation can create conditions that allow moisture to collect.
Heating supply air is generally warm and less likely to condense inside the duct during normal operation. However, a cold return section or poorly insulated connection may experience different conditions. The location of the moisture is therefore more important than simply identifying the system as a heating duct.
Moisture Left From the Cooling Season
Many homes use the same ductwork for central heating and air conditioning. During summer, the cooling coil removes moisture from indoor air and sends condensate toward a drainage system. Problems with drainage or duct insulation can allow nearby materials to become damp.
If those materials are not dried or replaced before the heating season begins, existing contamination may remain inside the shared duct system. The furnace does not necessarily create the original problem. Mold discovered during winter may have developed months earlier when the air conditioner was operating.
High Indoor Humidity
Indoor humidity can increase when moisture-producing activities are not adequately ventilated. Overusing a whole-house humidifier may also raise humidity beyond what the building can manage. During cold weather, excess moisture is more likely to condense on certain cold building surfaces.
The Environmental Protection Agency recommends keeping indoor humidity ideally between 30% and 50% when practical. Winter conditions may require a lower setting to prevent condensation on cold windows or other surfaces. Monitoring humidity helps identify whether the home contains more moisture than its building materials can tolerate.
Damaged Duct Connections and Insulation
Loose duct joints can allow air to move through unintended openings. Depending on pressure and temperature conditions, this may contribute to moisture entering the duct system or reaching cold surfaces. Damaged insulation can also expose sections of ductwork to temperatures that increase condensation risk. Our air duct leak repair service addresses these gaps before they lead to moisture problems.
A disconnected duct does not automatically contain mold. However, persistent water exposure can affect insulation or nearby building materials. Restoring damaged connections helps maintain proper airflow and reduces unwanted air exchange.
Can Mold Grow Inside Hot Heating Ducts?
Mold can remain inside heating ductwork even when warm air passes through the system. Typical residential heating temperatures do not serve as a reliable method of disinfecting ducts. Although heating can reduce relative humidity in moving air, it does not automatically remove established contamination.
A furnace may supply air at temperatures above normal room temperature, but these conditions are not comparable to controlled high-temperature sterilization. Mold spores and contaminated particles can remain on surfaces after the materials dry. The absence of active growth during heating does not prove the ductwork has been restored.
Another important distinction involves heating systems that remain inactive during summer. A dormant duct may experience moisture exposure while the furnace is off. When heating resumes, the existing deposits may become more noticeable because air is moving through the system again.
The presence of mold therefore depends on the duct's moisture history rather than its current operating temperature alone.
Where Does Mold Usually Develop in Heating Systems?
Mold contamination can occur in different parts of a forced-air heating system when moisture becomes trapped. Areas near humidifiers deserve attention because they contain equipment designed to introduce water into the airflow. Other vulnerable locations include damp duct insulation and connections affected by building leaks.
| Heating System Component | Possible Moisture Source | Potential Problem |
|---|---|---|
| Furnace humidifier | Leaking water supply or drainage problem | Damp surrounding surfaces |
| Supply duct near humidifier | Excess humidifier moisture | Wet deposits inside the duct |
| Return duct in an attic | Humid air meeting cold surfaces | Localized condensation |
| Duct insulation | Roof leak or condensation | Moisture trapped in porous material |
| Shared heating and cooling ducts | Earlier AC drainage problem | Contamination remaining from cooling season |
| Furnace filter area | Water intrusion or humidifier leak | Dampness near filtration components |
The location of contamination can help identify the likely moisture source. Growth concentrated near an attached humidifier suggests a different problem from mold found inside insulation affected by a roof leak. Treating every duct as equally contaminated may lead to unnecessary cleaning or replacement.
The type of duct material also matters. Bare metal surfaces may be suitable for cleaning under controlled conditions, while wet or moldy fiberglass duct materials generally require replacement. The material should be identified before any remediation method is selected.
How Can You Tell if There Is Mold in Heating Ducts?
Suspected mold may become noticeable through visible deposits or a persistent musty odor when the heating system operates. However, neither sign confirms contamination inside the ducts by itself. Dust and soot can produce dark deposits, while unusual odors may originate from other parts of the building.
One useful clue is the history of moisture around the heating equipment. A leaking humidifier or recently repaired roof leak can create conditions where mold becomes more likely. An isolated dark deposit on a dry grille provides less evidence than material found on visibly damp insulation.
Warning Signs to Watch For
Common warning signs include:
- Irregular dark patches appear on accessible internal duct surfaces.
- A persistent musty odor occurs while the furnace blower operates.
- Water stains develop near heating duct openings.
- The furnace humidifier shows signs of leaking.
- Insulation around accessible ducts appears damp.
- Mold-like deposits appear near the humidifier connection.
- A recent water leak affected an area containing ductwork.
- Dark material repeatedly appears inside the same vent opening.
- The filter compartment shows signs of water damage.
- Suspected growth remains visible after the surrounding area dries.
These signs can indicate moisture problems without confirming that mold is present. For example, a dark stain may come from soot or ordinary dust. The source and appearance of the material should be evaluated together.
A burning smell when a furnace first starts after months of inactivity is not automatically a mold odor. Dust on heating components can sometimes produce a temporary smell as the equipment warms. Persistent smoke odors or soot near fuel-burning equipment require a separate safety investigation.
How Does Mold in Heating Ducts Develop Over Time?
Mold growth depends on the amount of available moisture and how long the affected material remains wet. Damp porous insulation can provide conditions for growth even when nearby metal surfaces dry more quickly. Drying the visible duct surface does not always mean concealed insulation has recovered.
Mold may begin developing within 24 to 48 hours when materials remain damp under suitable conditions. However, there is no universal schedule for visible growth or contamination spreading through a system. The condition of the affected material determines how the problem progresses.
| Condition | Possible Effect | Appropriate Response |
|---|---|---|
| Brief moisture exposure | Temporary dampness | Identify and correct the source |
| Moisture lasting 24 to 48 hours | Mold growth becomes possible | Dry or remove affected materials promptly |
| Repeated humidifier leakage | Continuing wet conditions | Correct humidifier drainage |
| Wet internal insulation | Contamination may develop within porous material | Evaluate affected duct section |
| Unresolved moisture after cleaning | Growth may return | Address the original water problem |
A useful distinction is whether water exposure occurred once or continues repeatedly. A small leak corrected quickly may affect a limited area, while ongoing humidifier overflow can keep the same duct section wet for an extended period.
The extent of contamination should be documented before deciding whether cleaning or replacement is necessary.
How Can You Check Heating Ducts for Moisture Problems?
Homeowners can perform a limited inspection to look for water exposure around accessible heating equipment. This should focus on observation rather than opening sealed furnace compartments or disturbing suspected contamination. The goal is to identify visible moisture conditions that may explain the problem.
Begin with the heating system turned off and inspect accessible surrounding areas for water stains. If the furnace has a humidifier, review its maintenance instructions and check for signs of leakage without opening electrical equipment. A hygrometer can also help identify indoor humidity levels that may contribute to condensation.
Follow these steps:
- Check indoor humidity: Record the relative humidity with a digital hygrometer.
- Inspect accessible duct connections: Look for water staining or visibly damaged insulation.
- Examine the humidifier area: Check for signs of leaks around accessible components.
- Look for previous water damage: Inspect nearby ceilings and walls for discoloration.
- Photograph unusual deposits: Document suspected growth without scraping it.
- Record when odors occur: Note whether the smell appears during heating or when only the blower operates.
If internal HVAC contamination is known or credibly suspected, stop operating the affected system until it has been assessed. Avoid handling suspected moldy insulation because disturbing it can release particles into occupied areas.
This preliminary inspection cannot determine whether every concealed duct is contaminated. However, it can help identify the moisture source and provide useful information for further evaluation.
Can Mold in Heating Ducts Spread Through the House?
An HVAC system containing mold can distribute particles when air passes over contaminated components. However, the presence of contamination in one accessible area does not prove that mold has spread throughout the house. The potential for distribution depends on where growth occurs and how the airflow interacts with it.
A contaminated return-side component may be located upstream of the blower and filtration system. Material near a supply opening may have a different path into occupied rooms. These differences matter because the location of growth affects how particles could move.
Mold exposure can cause allergic reactions or respiratory symptoms in some people. Individuals with asthma may be more sensitive to damp indoor environments. However, symptoms alone cannot identify heating ducts as the source because mold can also develop elsewhere in the building.
The appropriate response is to identify confirmed contamination and correct the moisture problem rather than assume every odor or symptom comes from the ductwork.
Does Mold in Heating Ducts Require Cleaning or Replacement?
The correct response depends on whether the affected material is nonporous or porous. Sound bare sheet metal can often be cleaned when contamination is confirmed and proper methods are used. Fiberglass duct materials require more caution because water and contamination can remain within their structure.
When internal fiberglass insulation becomes wet or moldy, replacement is generally recommended because surface cleaning cannot reliably restore the material. The same concern applies to contaminated flexible duct sections that cannot be cleaned effectively. Replacing the affected section may be more appropriate than treating it with chemical sprays.
| Duct Material | Main Concern | Likely Response |
|---|---|---|
| Bare metal duct | Surface contamination | Cleaning may be possible |
| Internally insulated metal | Growth within liner | Replace affected insulation |
| Fiberglass duct board | Moisture retained between fibers | Replace moldy material |
| Flexible insulated duct | Contaminated liner or insulation | Replace affected section |
| Damaged metal connection | Air leakage or moisture entry | Repair connection and address contamination |
The original water problem must also be corrected. Cleaning a bare metal duct while leaving a leaking humidifier in operation can lead to renewed contamination. Likewise, replacing wet insulation without addressing condensation may allow the new material to become damaged.
How Much Does Heating Duct Mold Remediation Cost in 2026?
The cost depends on the location of the contamination and the materials affected. Localized mold inside an accessible metal duct generally requires a different scope of work from extensive contamination involving a furnace humidifier or multiple insulated branches. Repairing the source of water may add to the total expense.
The following are broad U.S. cost benchmarks reported for 2026.
| Condition | Typical Work | Estimated 2026 Cost |
|---|---|---|
| Small isolated exterior hard surface | Suitable surface cleaning | Basic household cleaning supplies |
| Localized mold inside ductwork | Duct mold remediation | $600 to $2,000 |
| Significant HVAC contamination | Broader HVAC remediation | $3,000 to $10,000 |
| Moldy internal insulation | Remove and replace affected material | Requires a section-specific estimate |
These costs describe different project scopes and should not be added together automatically. A limited section affected by a humidifier leak may need much less work than an HVAC system with widespread moisture damage.
Pricing should follow the documented extent of contamination rather than the number of heating vents in the home. A dark stain on one grille is not sufficient evidence for a complete duct remediation project.
When Should You Call an HVAC Professional?
Professional evaluation is appropriate when suspected mold appears inside heating ducts or around a furnace humidifier. Wet internal insulation and persistent moisture also require attention because household cleaning cannot reliably correct these conditions. The assessment should identify the affected materials and determine where the water originated.
A qualified HVAC technician can inspect humidifier drainage and examine accessible duct connections. When contamination is extensive, a mold remediation specialist may be needed to remove affected material while limiting the spread of particles. The method should match the duct construction and the extent of growth.
A sound metal duct may be suitable for cleaning after the moisture source is corrected. However, moldy fiberglass insulation generally requires replacement. Spraying chemicals into the duct system is not a substitute for removing material that cannot be restored.
The inspection should also distinguish mold-related concerns from combustion safety problems. Soot near a gas or oil furnace requires prompt attention because it may indicate faulty combustion or exhaust conditions. Black deposits alone cannot determine whether the problem involves mold or combustion residue.
How Can You Prevent Mold From Growing in Heating Ducts?
Preventing heating duct mold depends on keeping the duct system dry throughout the year. Winter humidification and summer cooling can both influence moisture conditions in shared ductwork. Proper maintenance should address the equipment and the building areas where ducts are installed.
Maintain Furnace Humidifiers
Follow the humidifier manufacturer's maintenance instructions and clean or replace its water-related components as recommended. Inspect accessible connections for signs of leaks or drainage problems during the heating season. A humidifier should add controlled moisture to the air without allowing water to collect in the surrounding ductwork.
Monitor Indoor Humidity During Winter
Use a hygrometer to check indoor relative humidity and adjust humidification based on outdoor conditions. A general target of 30% to 50% is useful in many homes, although colder weather may require lower levels to prevent condensation. Water repeatedly collecting on cold windows or surfaces is a sign that the humidity setting may be too high.
Inspect Duct Insulation and Connections
Check safely accessible ducts for damaged insulation or separated joints during regular HVAC maintenance. Ducts running through unconditioned spaces may experience large temperature differences that contribute to condensation. Repairing identified damage helps maintain proper airflow and reduces unwanted air exchange.
Address Moisture After the Cooling Season
Inspect the cooling system's drainage condition during seasonal maintenance, especially when the heating and cooling systems share ductwork. Wet insulation or signs of previous water damage should be investigated before the furnace operates regularly. Correcting moisture problems between seasons reduces the likelihood of discovering old contamination after heating begins.
Conclusion
Mold in heating ducts develops because moisture reaches surfaces that can support fungal growth. Furnace humidifiers and building leaks are possible sources, while shared cooling ducts may retain earlier water damage. Heating alone does not reliably eliminate existing contamination. The affected material and moisture source determine the necessary response. This week, inspect your furnace humidifier and check accessible duct connections for signs of dampness.